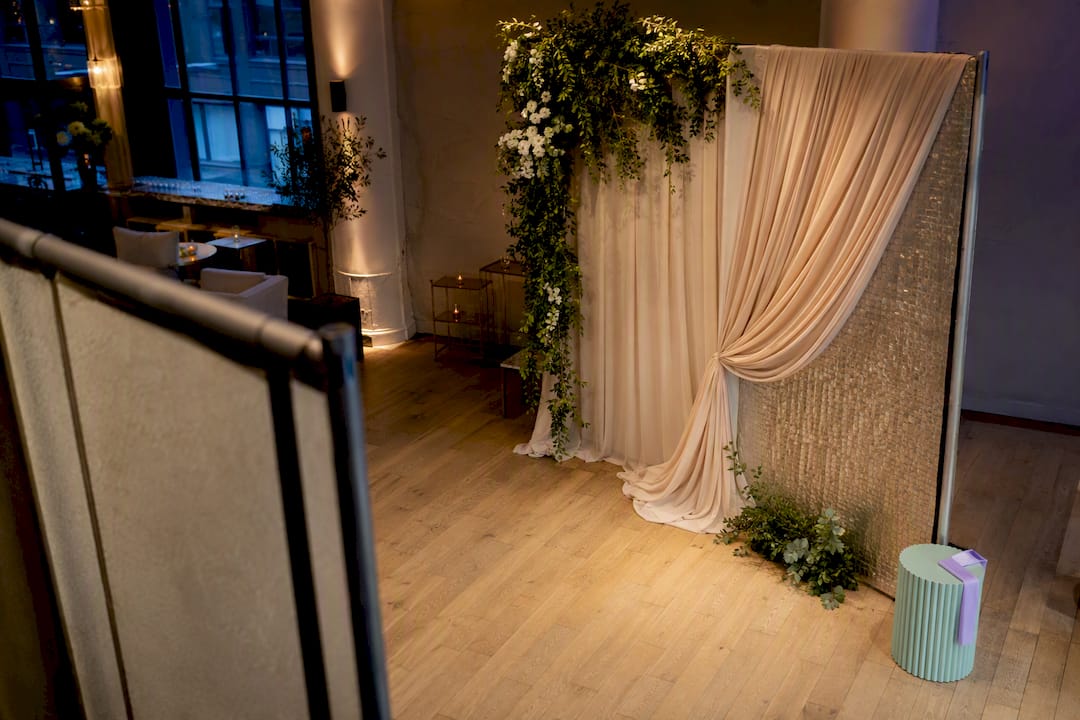
12 photo booth backdrop ideas that photograph well, each with a photographer friendly tip, realistic budget, and build time.
For the fastest high-impact photo booth backdrop, use a sequin curtain or layered streamer fringe. Both catch light beautifully and go up in under 30 minutes. A balloon wall wins for versatility across party themes, while faux florals suit weddings and dressier events. Build whatever you choose the night before, then test it under your actual lighting before guests arrive.
TL;DR:
• Sequin curtains are ideal for evening glam parties and take approximately 20 minutes to hang, reflecting light beautifully for flash photography.
• Balloon walls are highly versatile, but their setup requires around 45 to 60 minutes and is best indoors to prevent deflation from wind.
• For photography, choose matte fabric with dimensions of at least 8 by 8 feet for group shots, maintaining a 3 to 6 feet distance from guests to avoid shadows.
• DIY backdrops like layered streamer fringe or kraft paper can be assembled quickly and cheaply, but outdoor setups or larger events may benefit from professional rental solutions.
• Always build and test your backdrop the night before to fix wrinkles, glare, or sizing issues, ensuring optimal results during the event.
• Quick Picks: The 6 Fastest Photo Booth Backdrop Ideas
• Materials, Sizing, and Lighting: What Actually Makes Backdrops Photograph Well
• 12 DIY Photo Booth Backdrop Ideas You Can Actually Build
• Setup Checklist and Tools to Bring on Event Day
• Seasonal and Holiday Backdrop Ideas Worth Stealing
• Photo Booth Props and Interactive Elements That Pair Well With a Backdrop
• Theme-Based Backdrop Ideas for Weddings, Birthdays, and Corporate Events
• DIY Backdrop Creation Tutorials and Tips That Actually Work
• Porcci NYC’s Take: When DIY Works and When to Call in a Rental
• Where to Go Next for Backdrop Templates and Technical Guidance
• Sources
• FAQ
If you need to decide right now, here’s how the fastest options stack up against each other.
• Sequin curtain: Best for glam parties, birthdays, and evening events with flash photography. Costs $18 to $28 and takes about 20 minutes to hang. The reversible sequins throw light back into faces, which flatters skin tones under indoor lighting.
• Streamer fringe curtain: The cheapest high-return option at $9 to $13, with a 15 to 20 minute build. Movement in the fringe adds texture without any pattern clashing.
• Balloon wall or garland: The most adaptable pick for any celebration, running $15 to $27 with 45 to 60 minutes of setup, mostly spent tying clusters.
• Faux flower wall: The go-to for weddings and showers, at $25 to $40 and roughly an hour of assembly.
• Greenery plus fairy lights: Ideal for boho or outdoor dusk parties, blending texture with warm ambient glow.
• Kraft paper roll: The emergency backup. It won’t win style points, but it hangs in under 10 minutes when you’re out of time.
The material you choose determines how much glare, wrinkling, and color shift shows up in your photos. Matte fabric absorbs light evenly and hides seams, which is why tension polyester is the professional standard for glare-free step-and-repeat backdrops. Sequins reflect light intentionally, so they work for flash photography but wash out under harsh overhead LEDs. Vinyl holds up outdoors and resists weather, but its glossy surface can bounce light straight back into the lens.
Size matters more than most planners expect. The industry benchmark is 8 feet by 8 feet for group shots, with 6 feet by 7 feet as the floor for smaller gatherings of two or three people. A useful rule of thumb: budget about 2 feet of width per adult standing in a single row, and go wider if guests tend to pose in clusters rather than lines.
Sizing and placement checklist:
• Keep at least 3 to 6 feet of distance between the backdrop and your subjects to avoid harsh shadow lines.
• Position the booth so windows sit behind the camera, not behind the backdrop, to avoid backlighting silhouettes.
• Leave a visible margin around any focal graphic or logo so it doesn’t get cropped out of tighter shots.
• Anchor the base with sandbags or water-filled stands whenever the setup sits near a doorway or outdoor breeze.
Pro Tip: Take one test photo standing at your expected shooting distance before guests arrive. If the backdrop edges creep into frame or the fabric shows wrinkles under flash, fix it now instead of during the party.
Each of these has a real budget, a real setup time, and one detail that changes how it photographs.
1. Classic sequin curtain. Hang a reversible sequin panel from a tension rod or PVC frame. Budget $18 to $28, 20 minutes to set up. Angle a light source at 45 degrees so the sequins sparkle instead of glaring straight into the lens.
2. Layered streamer fringe. Tape three or four rows of crepe fringe to a wall or frame in alternating colors. Budget $9 to $13, 15 to 20 minutes. Reusable if stored flat in a bin between events.
3. Balloon garland arch. Cluster balloons in odd-numbered groupings and attach with hot glue or balloon tape to a curved frame. Budget $15 to $27, 45 to 60 minutes. Best indoors, since wind deflates the effect fast.
4. Faux flower wall panel. Zip-tie individual faux flower mats to a grid frame or trellis. Budget $25 to $40, about an hour. Works indoors or in shaded outdoor spots; direct sun fades the fabric over repeated use.
5. Greenery and fairy light backdrop. Layer faux ivy panels over a frame, then thread warm white string lights through the leaves. Best for dusk outdoor events. Store the lights separately from the greenery to avoid tangled setup next time.
6. Kraft paper roll wall. Unroll brown kraft paper across a flat wall and secure with painter’s tape. Under $10, 10 minutes. The emergency fallback for last-minute bookings.
7. Dollar-store tablecloth fringe. Cut plastic tablecloths into fringe strips and layer them for a low-budget metallic curtain. Costs under $10 to $20 when bought in bulk. Handle gently. Plastic tears more easily than fabric fringe.
8. Cardboard and streamer hybrid. Cover large cardboard panels with glued streamers or tissue paper for a sturdy, low-cost frame, following the $10 build method that pairs cardboard structure with paper texture. Good for indoor use where wind isn’t a factor.
9. Tissue paper flower backdrop. Fold and fluff tissue paper into oversized flower shapes, then pin to a fabric or foam backing. Budget under $20, 40 to 50 minutes. Reusable for two or three events before the paper starts to sag.
10. Neutral fabric drape. Clip a solid-color bedsheet or muslin fabric to a rod for a clean, matte background that works for any theme. Budget under $15, 10 minutes. The safest pick when you’re unsure what else will clash with décor.
11. Branded step-and-repeat panel. Print a logo pattern on matte poster board or fabric, staggering the grid so a logo appears beside every guest regardless of pose, following the staggered logo layout used for corporate events. Budget varies by print size; setup runs 30 minutes with a frame.
12. Wood pallet and lights backdrop. Stand reclaimed pallets upright, side by side, and wrap with string lights or small florals for a rustic outdoor look. Budget under $15 if pallets are free. Best outdoors on stable, level ground.
Bring these:
• A tension rod, PVC frame, or step-and-repeat stand rated for your backdrop’s weight.
• Command strips for walls you can’t drill, plus painter’s tape as backup.
• Sandbags or water-filled stand weights for any outdoor or high-traffic setup.
• A tape measure to confirm your 8 by 8 foot working space before guests arrive.
• A phone or camera to shoot test photos at 3 to 6 feet from the backdrop.
Build the full backdrop the night before whenever possible, then run test shots to catch wrinkles, glare, or gaps in the frame while you still have time to fix them. On event day, budget 20 extra minutes for wind, uneven walls, or last-minute repositioning. When you pack up, fold fringe and fabric flat, and store faux florals in a box rather than a bag to keep the shape intact for reuse.
Winter holiday parties lean into metallic and evergreen tones. A sequin curtain in silver or gold pairs naturally with string lights and a few faux pine branches tucked along the edges. For Halloween, layered black and orange streamer fringe photographs surprisingly well under warm lighting, since the fringe catches shadow without looking flat.
Spring events, especially baby showers and Easter gatherings, favor pastel balloon garlands or faux flower walls in soft pink, cream, and sage. Summer outdoor parties do best with greenery and fairy lights, since the warm dusk glow flatters skin tones once the sun starts to drop. A bamboo or natural-material accent along the base of a greenery wall adds texture without extra cost.
Fourth of July and patriotic events call for red, white, and blue streamer fringe, which photographs cleanly as long as you avoid stacking all three colors in equal thirds. That pattern tends to compete with clothing in group shots. New Year’s Eve favors gold and black sequins with a countdown sign as the focal prop.
Whatever the season, the backdrop should complement the room’s existing decor rather than fight it. A backdrop that clashes with tablecloths or lighting pulls attention away from the people in the photo, which defeats the point of building one in the first place.
A backdrop sets the scene, but the wedding photo booth props and interactive pieces are what make guests actually stop and use the booth. Foam letter signs spelling out a couple’s initials or a birthday year work with almost any backdrop style. Oversized sunglasses, feather boas, and paper fans remain reliable favorites because they photograph clearly and don’t require explanation.

A photo booth props checklist should include at least one item guests can hold, one they can wear, and one sign with text, since that combination covers most pose styles naturally. For corporate photo booth props, branded items work better than novelty ones. A custom neon sign, a step-and-repeat logo panel, or company-colored balloon clusters keep the tone professional while still giving guests something to interact with.
Interactive elements extend beyond handheld props. A chalkboard sign where guests write a quick message before posing adds a personal touch that a static backdrop can’t provide on its own. Confetti poppers or oversized balloon numbers work well for milestone birthdays and anniversaries, but keep loose confetti away from fabric backdrops. It clings to sequins and fringe and takes real effort to clean off between shots. Whatever props you choose, keep them within arm’s reach of the backdrop so guests aren’t wandering off to grab items mid-pose.
Weddings tend to photograph best against soft, romantic textures rather than anything with sharp graphic patterns. Faux flower walls, draped ivory fabric, and greenery arches all fit the tone, and research on backdrop selection confirms that plain fabric or floral edges consistently outperform busy printed designs for wedding photo booth backdrop ideas. Save any bold pattern for a small accent rather than the entire panel.
Birthday parties give you more room to play. Balloon walls in the honoree’s favorite colors, a bold “Happy Birthday” sign, or a themed backdrop tied to a hobby or favorite show all work, since the goal is fun over elegance. Kids’ birthdays especially benefit from bright, saturated colors that read well in photos even under imperfect lighting.
Corporate events call for a different approach entirely. A clean, neutral step-and-repeat panel with a staggered logo grid keeps the brand visible without overwhelming the frame, and matte tension fabric is the standard material choice because it avoids the hot spots that vinyl produces under flash. Best practice among event professionals is to keep corporate photo booth backdrop designs simple enough that a company logo remains visible beside every guest, regardless of how they pose.
Most successful DIY backdrops follow the same basic sequence: build the frame first, attach the material in sections, then step back and check for gaps before adding any final accents. Starting with a sturdy frame, whether that’s PVC pipe, a tension rod, or a repurposed curtain rod, prevents the sagging that ruins otherwise good-looking fringe and fabric backdrops.
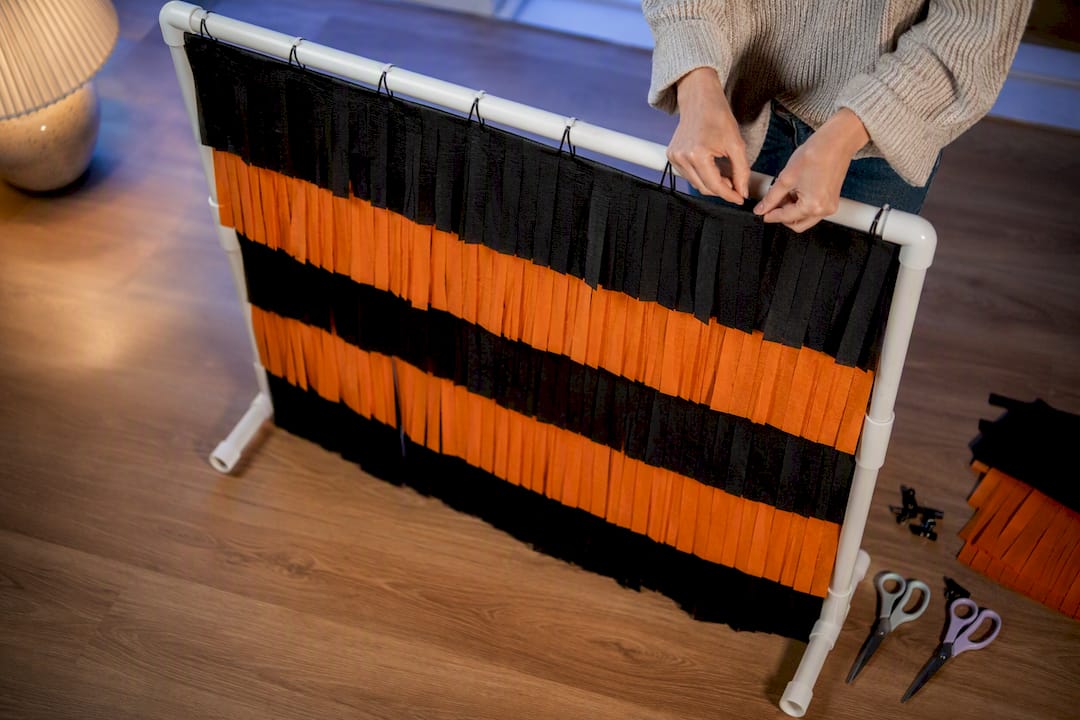
Attach material from the top down and work in overlapping sections rather than trying to hang one giant piece at once. This is especially true for fringe and streamer builds, where uneven rows are obvious in photos but nearly invisible once layered correctly. For paper and tissue builds, work in a low-humidity space if possible. Humidity makes tissue paper flowers droop faster than you’d expect.
One detail that trips up a lot of first-time builders: fabric and paper both need a few hours to “settle” after hanging, since gravity pulls out folds and creases that looked fine right after assembly. That’s part of why building the night before matters as much as the material choice itself. It’s not just about having time to fix mistakes. It’s giving the backdrop time to hang correctly before the camera ever points at it.
Keep the backdrop wide enough that the venue doesn’t creep into the edges of your shots, and resist the urge to add too many competing textures to one panel. A backdrop’s job is to frame the people standing in front of it, not to compete with them for attention.
DIY backdrops work well for guest lists under 50, single-location events, and indoor setups where weather isn’t a variable. Once you’re running a multi-hour event, a larger guest list, or an outdoor space exposed to wind and sun, the math shifts. Some professional companies build photo booths with weighted stands, backup lighting, and on-site staffing to address common issues with DIY setups. If your event has any of those pressure points, our photo booth playbook covers the props and flow details that keep a line moving instead of backing up.
— PORCCI
For step-by-step budget builds, the $10 backdrop tutorial walks through cardboard and paper construction in detail. For sizing and material specs, the step-and-repeat guide breaks down fabric-versus-vinyl tradeoffs. Test your backdrop with sample photos before the event, not after.
If you’d rather skip the building entirely, Porcci NYC’s photo booth rental options come with backdrops, lighting, and setup already handled. You can also get a quote for your event date directly.
• 12 Brilliant DIY Photo Booth Ideas That Will Make Any Party Unforgettable
• Step and repeat backdrop event guide
• Dollar Store DIY Photo Booth Backdrop
• DIY photo booth backdrop tricks for memorable events
Plain, matte-finish fabric in a neutral or complementary color tends to photograph best because it avoids glare and doesn’t compete with guests’ outfits. For sparkle and impact, a reversible sequin curtain is the top choice among quick DIY builds.
Layered streamer fringe or a dollar-store plastic tablecloth build can cost as little as $9 to $20 and take under 20 minutes to assemble. Kraft paper is the fastest and cheapest emergency option if you’re short on both time and budget.
Mount the backdrop material to a frame, tension rod, or wall using command strips or tape, then position it 3 to 6 feet behind where guests will stand. Weight the base with sandbags or a stand if the setup is near a doorway or outdoors to prevent tipping.
The industry standard is 8 feet by 8 feet for group shots, with 6 feet by 7 feet as the minimum for two or three people. Budget roughly 2 feet of width per adult if you expect larger groups posing together.
Build and test your backdrop the night before whenever possible, since fabric and paper both need time to settle and hang correctly. Testing under real lighting ahead of time catches glare, wrinkles, and sizing issues before guests ever step in front of the camera.
12 photo booth backdrop ideas that photograph well, each with a photographer friendly tip, realistic budget, and build time.
For the fastest high-impact photo booth backdrop, use a sequin curtain or layered streamer fringe. Both catch light beautifully and go up in under 30 minutes. A balloon wall wins for versatility across party themes, while faux florals suit weddings and dressier events. Build whatever you choose the night before, then test it under your actual lighting before guests arrive.
TL;DR:
• Sequin curtains are ideal for evening glam parties and take approximately 20 minutes to hang, reflecting light beautifully for flash photography.
• Balloon walls are highly versatile, but their setup requires around 45 to 60 minutes and is best indoors to prevent deflation from wind.
• For photography, choose matte fabric with dimensions of at least 8 by 8 feet for group shots, maintaining a 3 to 6 feet distance from guests to avoid shadows.
• DIY backdrops like layered streamer fringe or kraft paper can be assembled quickly and cheaply, but outdoor setups or larger events may benefit from professional rental solutions.
• Always build and test your backdrop the night before to fix wrinkles, glare, or sizing issues, ensuring optimal results during the event.
• Quick Picks: The 6 Fastest Photo Booth Backdrop Ideas
• Materials, Sizing, and Lighting: What Actually Makes Backdrops Photograph Well
• 12 DIY Photo Booth Backdrop Ideas You Can Actually Build
• Setup Checklist and Tools to Bring on Event Day
• Seasonal and Holiday Backdrop Ideas Worth Stealing
• Photo Booth Props and Interactive Elements That Pair Well With a Backdrop
• Theme-Based Backdrop Ideas for Weddings, Birthdays, and Corporate Events
• DIY Backdrop Creation Tutorials and Tips That Actually Work
• Porcci NYC’s Take: When DIY Works and When to Call in a Rental
• Where to Go Next for Backdrop Templates and Technical Guidance
• Sources
• FAQ
If you need to decide right now, here’s how the fastest options stack up against each other.
• Sequin curtain: Best for glam parties, birthdays, and evening events with flash photography. Costs $18 to $28 and takes about 20 minutes to hang. The reversible sequins throw light back into faces, which flatters skin tones under indoor lighting.
• Streamer fringe curtain: The cheapest high-return option at $9 to $13, with a 15 to 20 minute build. Movement in the fringe adds texture without any pattern clashing.
• Balloon wall or garland: The most adaptable pick for any celebration, running $15 to $27 with 45 to 60 minutes of setup, mostly spent tying clusters.
• Faux flower wall: The go-to for weddings and showers, at $25 to $40 and roughly an hour of assembly.
• Greenery plus fairy lights: Ideal for boho or outdoor dusk parties, blending texture with warm ambient glow.
• Kraft paper roll: The emergency backup. It won’t win style points, but it hangs in under 10 minutes when you’re out of time.
The material you choose determines how much glare, wrinkling, and color shift shows up in your photos. Matte fabric absorbs light evenly and hides seams, which is why tension polyester is the professional standard for glare-free step-and-repeat backdrops. Sequins reflect light intentionally, so they work for flash photography but wash out under harsh overhead LEDs. Vinyl holds up outdoors and resists weather, but its glossy surface can bounce light straight back into the lens.
Size matters more than most planners expect. The industry benchmark is 8 feet by 8 feet for group shots, with 6 feet by 7 feet as the floor for smaller gatherings of two or three people. A useful rule of thumb: budget about 2 feet of width per adult standing in a single row, and go wider if guests tend to pose in clusters rather than lines.
Sizing and placement checklist:
• Keep at least 3 to 6 feet of distance between the backdrop and your subjects to avoid harsh shadow lines.
• Position the booth so windows sit behind the camera, not behind the backdrop, to avoid backlighting silhouettes.
• Leave a visible margin around any focal graphic or logo so it doesn’t get cropped out of tighter shots.
• Anchor the base with sandbags or water-filled stands whenever the setup sits near a doorway or outdoor breeze.
Pro Tip: Take one test photo standing at your expected shooting distance before guests arrive. If the backdrop edges creep into frame or the fabric shows wrinkles under flash, fix it now instead of during the party.
Each of these has a real budget, a real setup time, and one detail that changes how it photographs.
1. Classic sequin curtain. Hang a reversible sequin panel from a tension rod or PVC frame. Budget $18 to $28, 20 minutes to set up. Angle a light source at 45 degrees so the sequins sparkle instead of glaring straight into the lens.
2. Layered streamer fringe. Tape three or four rows of crepe fringe to a wall or frame in alternating colors. Budget $9 to $13, 15 to 20 minutes. Reusable if stored flat in a bin between events.
3. Balloon garland arch. Cluster balloons in odd-numbered groupings and attach with hot glue or balloon tape to a curved frame. Budget $15 to $27, 45 to 60 minutes. Best indoors, since wind deflates the effect fast.
4. Faux flower wall panel. Zip-tie individual faux flower mats to a grid frame or trellis. Budget $25 to $40, about an hour. Works indoors or in shaded outdoor spots; direct sun fades the fabric over repeated use.
5. Greenery and fairy light backdrop. Layer faux ivy panels over a frame, then thread warm white string lights through the leaves. Best for dusk outdoor events. Store the lights separately from the greenery to avoid tangled setup next time.
6. Kraft paper roll wall. Unroll brown kraft paper across a flat wall and secure with painter’s tape. Under $10, 10 minutes. The emergency fallback for last-minute bookings.
7. Dollar-store tablecloth fringe. Cut plastic tablecloths into fringe strips and layer them for a low-budget metallic curtain. Costs under $10 to $20 when bought in bulk. Handle gently. Plastic tears more easily than fabric fringe.
8. Cardboard and streamer hybrid. Cover large cardboard panels with glued streamers or tissue paper for a sturdy, low-cost frame, following the $10 build method that pairs cardboard structure with paper texture. Good for indoor use where wind isn’t a factor.
9. Tissue paper flower backdrop. Fold and fluff tissue paper into oversized flower shapes, then pin to a fabric or foam backing. Budget under $20, 40 to 50 minutes. Reusable for two or three events before the paper starts to sag.
10. Neutral fabric drape. Clip a solid-color bedsheet or muslin fabric to a rod for a clean, matte background that works for any theme. Budget under $15, 10 minutes. The safest pick when you’re unsure what else will clash with décor.
11. Branded step-and-repeat panel. Print a logo pattern on matte poster board or fabric, staggering the grid so a logo appears beside every guest regardless of pose, following the staggered logo layout used for corporate events. Budget varies by print size; setup runs 30 minutes with a frame.
12. Wood pallet and lights backdrop. Stand reclaimed pallets upright, side by side, and wrap with string lights or small florals for a rustic outdoor look. Budget under $15 if pallets are free. Best outdoors on stable, level ground.
Bring these:
• A tension rod, PVC frame, or step-and-repeat stand rated for your backdrop’s weight.
• Command strips for walls you can’t drill, plus painter’s tape as backup.
• Sandbags or water-filled stand weights for any outdoor or high-traffic setup.
• A tape measure to confirm your 8 by 8 foot working space before guests arrive.
• A phone or camera to shoot test photos at 3 to 6 feet from the backdrop.
Build the full backdrop the night before whenever possible, then run test shots to catch wrinkles, glare, or gaps in the frame while you still have time to fix them. On event day, budget 20 extra minutes for wind, uneven walls, or last-minute repositioning. When you pack up, fold fringe and fabric flat, and store faux florals in a box rather than a bag to keep the shape intact for reuse.
Winter holiday parties lean into metallic and evergreen tones. A sequin curtain in silver or gold pairs naturally with string lights and a few faux pine branches tucked along the edges. For Halloween, layered black and orange streamer fringe photographs surprisingly well under warm lighting, since the fringe catches shadow without looking flat.
Spring events, especially baby showers and Easter gatherings, favor pastel balloon garlands or faux flower walls in soft pink, cream, and sage. Summer outdoor parties do best with greenery and fairy lights, since the warm dusk glow flatters skin tones once the sun starts to drop. A bamboo or natural-material accent along the base of a greenery wall adds texture without extra cost.
Fourth of July and patriotic events call for red, white, and blue streamer fringe, which photographs cleanly as long as you avoid stacking all three colors in equal thirds. That pattern tends to compete with clothing in group shots. New Year’s Eve favors gold and black sequins with a countdown sign as the focal prop.
Whatever the season, the backdrop should complement the room’s existing decor rather than fight it. A backdrop that clashes with tablecloths or lighting pulls attention away from the people in the photo, which defeats the point of building one in the first place.
A backdrop sets the scene, but the wedding photo booth props and interactive pieces are what make guests actually stop and use the booth. Foam letter signs spelling out a couple’s initials or a birthday year work with almost any backdrop style. Oversized sunglasses, feather boas, and paper fans remain reliable favorites because they photograph clearly and don’t require explanation.
A photo booth props checklist should include at least one item guests can hold, one they can wear, and one sign with text, since that combination covers most pose styles naturally. For corporate photo booth props, branded items work better than novelty ones. A custom neon sign, a step-and-repeat logo panel, or company-colored balloon clusters keep the tone professional while still giving guests something to interact with.
Interactive elements extend beyond handheld props. A chalkboard sign where guests write a quick message before posing adds a personal touch that a static backdrop can’t provide on its own. Confetti poppers or oversized balloon numbers work well for milestone birthdays and anniversaries, but keep loose confetti away from fabric backdrops. It clings to sequins and fringe and takes real effort to clean off between shots. Whatever props you choose, keep them within arm’s reach of the backdrop so guests aren’t wandering off to grab items mid-pose.
Weddings tend to photograph best against soft, romantic textures rather than anything with sharp graphic patterns. Faux flower walls, draped ivory fabric, and greenery arches all fit the tone, and research on backdrop selection confirms that plain fabric or floral edges consistently outperform busy printed designs for wedding photo booth backdrop ideas. Save any bold pattern for a small accent rather than the entire panel.
Birthday parties give you more room to play. Balloon walls in the honoree’s favorite colors, a bold “Happy Birthday” sign, or a themed backdrop tied to a hobby or favorite show all work, since the goal is fun over elegance. Kids’ birthdays especially benefit from bright, saturated colors that read well in photos even under imperfect lighting.
Corporate events call for a different approach entirely. A clean, neutral step-and-repeat panel with a staggered logo grid keeps the brand visible without overwhelming the frame, and matte tension fabric is the standard material choice because it avoids the hot spots that vinyl produces under flash. Best practice among event professionals is to keep corporate photo booth backdrop designs simple enough that a company logo remains visible beside every guest, regardless of how they pose.
Most successful DIY backdrops follow the same basic sequence: build the frame first, attach the material in sections, then step back and check for gaps before adding any final accents. Starting with a sturdy frame, whether that’s PVC pipe, a tension rod, or a repurposed curtain rod, prevents the sagging that ruins otherwise good-looking fringe and fabric backdrops.
Attach material from the top down and work in overlapping sections rather than trying to hang one giant piece at once. This is especially true for fringe and streamer builds, where uneven rows are obvious in photos but nearly invisible once layered correctly. For paper and tissue builds, work in a low-humidity space if possible. Humidity makes tissue paper flowers droop faster than you’d expect.
One detail that trips up a lot of first-time builders: fabric and paper both need a few hours to “settle” after hanging, since gravity pulls out folds and creases that looked fine right after assembly. That’s part of why building the night before matters as much as the material choice itself. It’s not just about having time to fix mistakes. It’s giving the backdrop time to hang correctly before the camera ever points at it.
Keep the backdrop wide enough that the venue doesn’t creep into the edges of your shots, and resist the urge to add too many competing textures to one panel. A backdrop’s job is to frame the people standing in front of it, not to compete with them for attention.
DIY backdrops work well for guest lists under 50, single-location events, and indoor setups where weather isn’t a variable. Once you’re running a multi-hour event, a larger guest list, or an outdoor space exposed to wind and sun, the math shifts. Some professional companies build photo booths with weighted stands, backup lighting, and on-site staffing to address common issues with DIY setups. If your event has any of those pressure points, our photo booth playbook covers the props and flow details that keep a line moving instead of backing up.
— PORCCI
For step-by-step budget builds, the $10 backdrop tutorial walks through cardboard and paper construction in detail. For sizing and material specs, the step-and-repeat guide breaks down fabric-versus-vinyl tradeoffs. Test your backdrop with sample photos before the event, not after.
If you’d rather skip the building entirely, Porcci NYC’s photo booth rental options come with backdrops, lighting, and setup already handled. You can also get a quote for your event date directly.
• 12 Brilliant DIY Photo Booth Ideas That Will Make Any Party Unforgettable
• Step and repeat backdrop event guide
• Dollar Store DIY Photo Booth Backdrop
• DIY photo booth backdrop tricks for memorable events
Plain, matte-finish fabric in a neutral or complementary color tends to photograph best because it avoids glare and doesn’t compete with guests’ outfits. For sparkle and impact, a reversible sequin curtain is the top choice among quick DIY builds.
Layered streamer fringe or a dollar-store plastic tablecloth build can cost as little as $9 to $20 and take under 20 minutes to assemble. Kraft paper is the fastest and cheapest emergency option if you’re short on both time and budget.
Mount the backdrop material to a frame, tension rod, or wall using command strips or tape, then position it 3 to 6 feet behind where guests will stand. Weight the base with sandbags or a stand if the setup is near a doorway or outdoors to prevent tipping.
The industry standard is 8 feet by 8 feet for group shots, with 6 feet by 7 feet as the minimum for two or three people. Budget roughly 2 feet of width per adult if you expect larger groups posing together.
Build and test your backdrop the night before whenever possible, since fabric and paper both need time to settle and hang correctly. Testing under real lighting ahead of time catches glare, wrinkles, and sizing issues before guests ever step in front of the camera.


