
Wind ruining your mic audio? Learn what causes wind noise, which windscreens and mic types help, and how to set up outdoor events so speech stays clear.
Wind noise is a physical problem, so the fix starts at the microphone, not in the mixer. Put a proper windscreen on it, choose a mic type that copes with air movement, keep it close to the speaker’s mouth, and block the breeze with whatever is nearby. Filters and software help, but only as a backup.
We set up sound for rooftops, backyards, parks and street-level events across NYC and New Jersey, and wind is the thing that surprises people most. A toast that sounded perfect at the soundcheck turns into a rumble the moment a gust comes off the river. Here is how to keep that from happening at your event.
• Wind noise comes from air turbulence hitting the mic body and diaphragm. It is not a sound wave, so you can’t simply turn it down afterward.
• Use real wind protection: foam for light air, a furry cover (deadcat) for strong wind, and a blimp or softie for shotgun-style mics.
• Omnidirectional mics handle wind better than directional ones, and a close mic position beats any gain trick.
• A high-pass (low-cut) filter set around 80 to 120 Hz for speech takes out rumble without thinning the voice.
• Plan the layout around the wind: use walls, tents and cars as breaks, and test at the spot where the speaker will actually stand.
• TL;DR
• Why wind makes noise in a microphone
• Choose the right microphone for a breezy event
• Windscreens, deadcats and blimps: what each one does
• Placement: the cheapest fix you have
• Settings that help: gain and high-pass filters
• If the wind noise is already recorded
• A quick outdoor event checklist
• Sound packages for outdoor and indoor events
• FAQ
• Sources
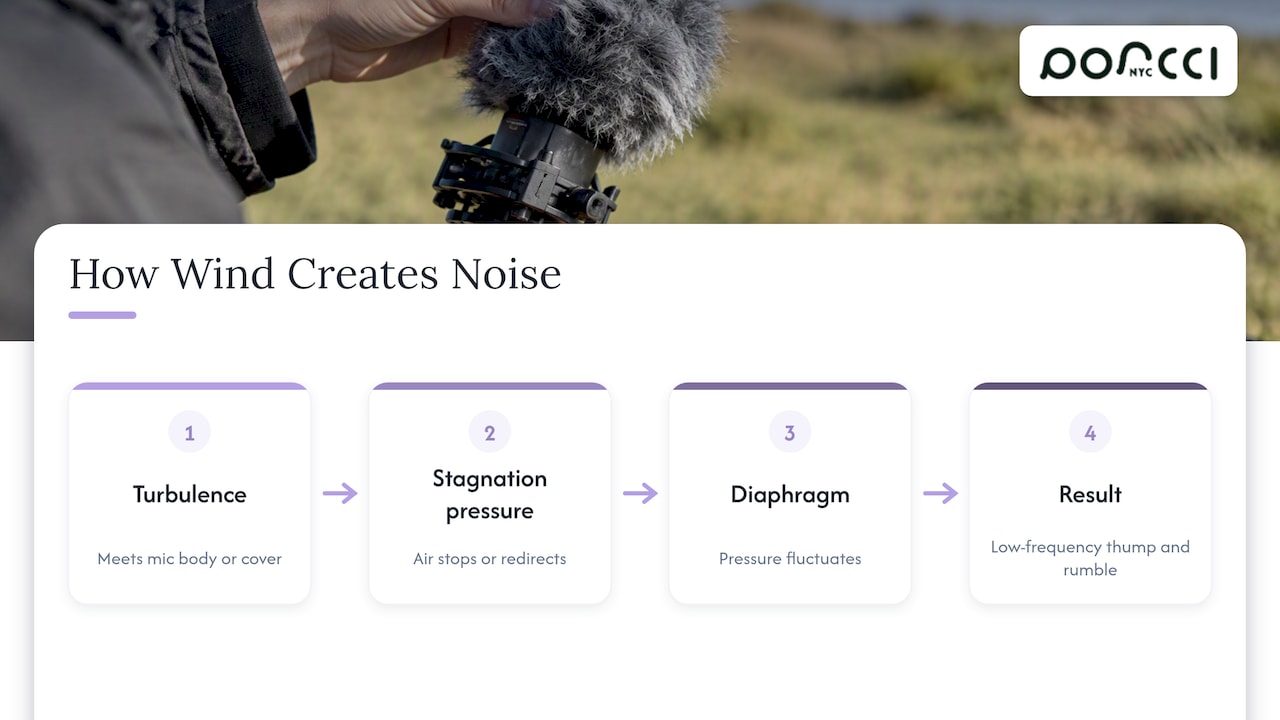
Most people assume a mic is picking up the sound of wind blowing past. It isn’t, really. Research from acoustics specialists explains that wind noise is mainly caused by atmospheric turbulence interacting with the microphone’s body or its covering, which creates fluctuating pressure changes on the diaphragm. The same source points to stagnation pressure, the pressure built when moving air is forced to stop or redirect around the mic, as a dominant contributor.
That matters for how you fix it. An academic paper in the Journal of the Acoustical Society of America describes wind noise as a physical interaction between turbulence and the microphone structure rather than a traditional sound wave, which is why ordinary noise reduction can’t fully remove it. The practical lesson: stop the wind before it touches the capsule.
The result is mostly low-frequency thump and rumble. Even a light breeze can do it if the mic is exposed and the gain is high. Gusts are worse than steady wind, because the level jumps around and your sound tech can’t ride it smoothly.
Before you reach for a cover, look at the mic itself. Pickup pattern makes a real difference.
• Omnidirectional mics work well in windy settings and are less susceptible to wind buffeting.
• Directional mics (cardioid, shotgun) are the weak spot. One microphone maker notes that directional microphones can be more susceptible to wind noise than omnidirectional ones by up to 20 dB.
• Lavalier mics are a solid choice for speakers who move. A small clip-on mic sits close to the mouth and is easy to shield. A mic that stays near the speaker also improves the signal-to-noise ratio, so the voice is louder relative to the wind.
For a wedding ceremony under an open sky, a lav on the officiant plus a handheld for readings is usually safer than a boom or shotgun on a stand. For a karaoke night on a terrace, handheld vocal mics with foam covers held near the mouth do the job, since the singer’s voice is loud relative to the breeze.
If you’re deciding between handheld, lavalier and headset systems, our guide to wireless microphone types for events walks through when each one fits.
Not all wind protection is equal, and the wrong choice can be worse than none. The basic idea is to create a pocket of still air around the capsule. A softie or zeppelin disperses wind and creates that calm air, while a plain foam sleeve is not effective outside, especially on shotgun mics.
| Protection | Best for | Wind level |
|---|---|---|
| Foam cover | Handheld vocal mics, lavs, indoor plosives | Light air only |
| Furry cover (deadcat) | Lavs, camera mics, clip-on transmitters | Designed for high-wind conditions |
| Blimp or zeppelin | Shotgun mics on a boom or stand | Greater protection, often with a furry cover on top |
| Natural windbreak | Any mic position | Reduces the wind before it arrives |
A blimp is a plastic housing for a shotgun microphone that works as both a windscreen and a shock mount. For event work, it’s the right tool for a boom mic capturing ceremony audio or a stage presentation.
Wind protection isn’t free. Research shows that windscreens reduce turbulent pressure while also attenuating acoustic signals. In plain terms, a thicker cover can slightly dull the top end. Another manufacturer notes that the stronger a windshield’s protective effect, the more it tends to influence the sound. So match the cover to the conditions. A deadcat on a breezy rooftop is the right call. The same deadcat at a calm indoor reception just muffles the voice.

Material matters too. The same research says that highly permeable materials have no effect on the flow or wind noise, while material that is too dense increases turbulent wake noise. That is a good reason to use purpose-made covers and not a sock, a scarf or a tied-on piece of fabric.
Before buying anything, move things around. Three habits cover most situations.
1. Get the mic close. The nearer it is to the speaker’s mouth, the less gain you need, and the less the wind competes with the voice. Hold a handheld about a fist from the mouth.
2. Use what’s already there. Trees, walls, fences, buildings and cars can all offer protection against wind. On a rooftop, place the speaking spot behind a parapet or a glass windbreak. In a park, tuck the setup behind a tent wall.
3. Hide the lav. For a lavalier, clipping it inside a shirt pocket rather than outside a tie can reduce wind noise. Under a jacket lapel or inside a collar works the same way, as long as the fabric doesn’t rub.
Also think about which way the speaker faces. If you can, have them stand with the wind at their side or back, so air isn’t blowing straight into the capsule. And do your soundcheck where the speaker will actually stand, at the time of day the event will happen. Wind on a Brooklyn waterfront at 4 p.m. is a different animal than the same spot at noon.
Wind lives in the low frequencies. A high-pass filter, often labeled low-cut on a mic or mixer, removes them. The research we reviewed notes that high-pass filters are effective on the 20 Hz to 250 Hz rumble associated with wind, and that this can be done during recording or in post.
For speech, a common starting range is 80 to 120 Hz for dialogue, or 70 to 100 Hz for interviews. Set it by listening. Cut too hard and you lose the warmth and fullness of the voice, which makes a speaker sound thin.
A few other settings habits:
• Engage the low-cut at the source if the mic or transmitter has one. It stops rumble from eating up headroom in the mixer.
• Keep gain honest. If you’re turning the gain up to fight a quiet speaker, the wind comes up with it. Fix the distance first.
• Put the filter on the channel, not the master, so music and playback keep their bass.
• Aim for intelligibility, not silence. Over-processing makes voices hollow or metallic, and a little residual air is more natural than a voice that sounds underwater.
For a deeper look at mics, mixers and lighting for smaller venues, see what we recommend for small NYC venues.
Sometimes you only find out afterward, usually when you play back the video from a ceremony. A few honest options:
1. Apply a careful high-pass filter. This can help, though filtering may negatively affect voices, and extreme buffeting is difficult to repair.
2. Try a de-plosive tool. Short bursts of low-frequency thump respond to the same kind of processing used for popped P sounds.
3. Use dedicated repair software. For example, the De-wind module in iZotope RX targets intermittent wind gusts, though it is generally ineffective against constant wind or extreme distortion.
The general rule is that post-production should be the last resort. It is far easier, and cheaper, to prevent the noise on the day than to rescue a once-in-a-lifetime toast later. If you’re filming the event, our notes on event recap videography cover how audio and video fit together afterward.
We have set up sound in enough backyards, rooftops and courtyards to know that the weather rarely cooperates with the timeline. What we tell every client is the same: plan for wind before you need to.
That means choosing mics that suit the space, bringing the right covers, and placing the speaking spot with the breeze in mind. It also means having someone on the day whose only job is the audio. A song operator or tech on site can ride the levels, swap a cover when a gust picks up, and keep the music flowing so your focus stays on the people in front of you.
Our packages are built around that idea. Delivery, setup and breakdown are included, and the gear is tested before it leaves us. For outdoor events, we match the system to the size of the crowd and the space, so a toast in a backyard sounds as clear as one in a ballroom.
PORCCI
Use this list the week before your event.
1. Check the setting. Is the speaking area open to the wind, or can you move it behind a wall, tent side or hedge?
2. Pick the mic for the job. Lavs for the ceremony or toast, handhelds with foam for singers and MCs, and an omnidirectional option where you can.
3. Pack the covers. Foam for light air, furry covers for exposed spots, a blimp if a shotgun mic is in play.
4. Test on location. Walk the speaker through the real position and listen for gusts, not just calm moments.
5. Set the low-cut. Start in the speech range above and adjust by ear.
6. Assign a backup. Keep a spare transmitter, spare covers and a person who knows the system.
For a full walkthrough of speakers, power and layout at home, our backyard party sound setup guide goes step by step.
If you’d rather hand this off, Porcci NYC delivers, sets up and breaks down the sound for you. Our AV and sound system packages start at $210 for the Small Party Package, with the Medium Events Package at $310, the Bigger Events Package at $440 and the Ultimate Package at $550. You can compare them on our AV and sound system rentals page.
Need someone running it live? A DJ service with a sound system starts from $990, and a song operator or tech staff member is $165. Local audio and visual rental pages are also available for Manhattan, Brooklyn and Staten Island.
Start with proper wind protection: a softie, zeppelin or furry cover that creates still air around the capsule. Then bring the mic close to the speaker, use natural windbreaks like walls or cars, and add a high-pass filter. Foam alone is not enough in real wind, particularly on shotgun mics.
Omnidirectional microphones are the most wind-tolerant because they are less prone to buffeting. Directional mics can be up to 20 dB more sensitive to wind noise. For people who speak while moving, a lavalier with a furry cover, placed close to the mouth, is a dependable choice.
Yes, slightly. Windscreens reduce turbulent pressure but also attenuate the acoustic signal, and stronger protection tends to affect the sound more. Pick the lightest cover that handles the conditions, so you get clean speech without muffling it.
A typical range is 80 to 120 Hz for dialogue and 70 to 100 Hz for interviews. Adjust by listening. If the voice starts to sound thin, lower the cutoff a little.
Partly. A gentle high-pass filter or a dedicated de-wind tool can tame occasional gusts. Constant wind or heavy distortion is very hard to repair, so prevention on the day is the better plan.
• As the Wind Blows: Turbulent Noise on Outdoor Microphones
• Wind-induced noise in a screened microphone, Journal of the Acoustical Society of America
• The ear training guide for audio producers, NPR Training
• Effective Wind Protection, SCHOEPS Microphones
• Audio For Film 101: Ways to Reduce Wind Noise When Recording Outside
• A field recording guide, SoundGuys
• 5 Ways to Reduce Wind Noise When Filming Outdoors, Elgato
Wind ruining your mic audio? Learn what causes wind noise, which windscreens and mic types help, and how to set up outdoor events so speech stays clear.
Wind noise is a physical problem, so the fix starts at the microphone, not in the mixer. Put a proper windscreen on it, choose a mic type that copes with air movement, keep it close to the speaker’s mouth, and block the breeze with whatever is nearby. Filters and software help, but only as a backup.
We set up sound for rooftops, backyards, parks and street-level events across NYC and New Jersey, and wind is the thing that surprises people most. A toast that sounded perfect at the soundcheck turns into a rumble the moment a gust comes off the river. Here is how to keep that from happening at your event.
• Wind noise comes from air turbulence hitting the mic body and diaphragm. It is not a sound wave, so you can’t simply turn it down afterward.
• Use real wind protection: foam for light air, a furry cover (deadcat) for strong wind, and a blimp or softie for shotgun-style mics.
• Omnidirectional mics handle wind better than directional ones, and a close mic position beats any gain trick.
• A high-pass (low-cut) filter set around 80 to 120 Hz for speech takes out rumble without thinning the voice.
• Plan the layout around the wind: use walls, tents and cars as breaks, and test at the spot where the speaker will actually stand.
• TL;DR
• Why wind makes noise in a microphone
• Choose the right microphone for a breezy event
• Windscreens, deadcats and blimps: what each one does
• Placement: the cheapest fix you have
• Settings that help: gain and high-pass filters
• If the wind noise is already recorded
• A quick outdoor event checklist
• Sound packages for outdoor and indoor events
• FAQ
• Sources
Most people assume a mic is picking up the sound of wind blowing past. It isn’t, really. Research from acoustics specialists explains that wind noise is mainly caused by atmospheric turbulence interacting with the microphone’s body or its covering, which creates fluctuating pressure changes on the diaphragm. The same source points to stagnation pressure, the pressure built when moving air is forced to stop or redirect around the mic, as a dominant contributor.
That matters for how you fix it. An academic paper in the Journal of the Acoustical Society of America describes wind noise as a physical interaction between turbulence and the microphone structure rather than a traditional sound wave, which is why ordinary noise reduction can’t fully remove it. The practical lesson: stop the wind before it touches the capsule.
The result is mostly low-frequency thump and rumble. Even a light breeze can do it if the mic is exposed and the gain is high. Gusts are worse than steady wind, because the level jumps around and your sound tech can’t ride it smoothly.
Before you reach for a cover, look at the mic itself. Pickup pattern makes a real difference.
• Omnidirectional mics work well in windy settings and are less susceptible to wind buffeting.
• Directional mics (cardioid, shotgun) are the weak spot. One microphone maker notes that directional microphones can be more susceptible to wind noise than omnidirectional ones by up to 20 dB.
• Lavalier mics are a solid choice for speakers who move. A small clip-on mic sits close to the mouth and is easy to shield. A mic that stays near the speaker also improves the signal-to-noise ratio, so the voice is louder relative to the wind.
For a wedding ceremony under an open sky, a lav on the officiant plus a handheld for readings is usually safer than a boom or shotgun on a stand. For a karaoke night on a terrace, handheld vocal mics with foam covers held near the mouth do the job, since the singer’s voice is loud relative to the breeze.
If you’re deciding between handheld, lavalier and headset systems, our guide to wireless microphone types for events walks through when each one fits.
Not all wind protection is equal, and the wrong choice can be worse than none. The basic idea is to create a pocket of still air around the capsule. A softie or zeppelin disperses wind and creates that calm air, while a plain foam sleeve is not effective outside, especially on shotgun mics.
| Protection | Best for | Wind level |
|---|---|---|
| Foam cover | Handheld vocal mics, lavs, indoor plosives | Light air only |
| Furry cover (deadcat) | Lavs, camera mics, clip-on transmitters | Designed for high-wind conditions |
| Blimp or zeppelin | Shotgun mics on a boom or stand | Greater protection, often with a furry cover on top |
| Natural windbreak | Any mic position | Reduces the wind before it arrives |
A blimp is a plastic housing for a shotgun microphone that works as both a windscreen and a shock mount. For event work, it’s the right tool for a boom mic capturing ceremony audio or a stage presentation.
Wind protection isn’t free. Research shows that windscreens reduce turbulent pressure while also attenuating acoustic signals. In plain terms, a thicker cover can slightly dull the top end. Another manufacturer notes that the stronger a windshield’s protective effect, the more it tends to influence the sound. So match the cover to the conditions. A deadcat on a breezy rooftop is the right call. The same deadcat at a calm indoor reception just muffles the voice.
Material matters too. The same research says that highly permeable materials have no effect on the flow or wind noise, while material that is too dense increases turbulent wake noise. That is a good reason to use purpose-made covers and not a sock, a scarf or a tied-on piece of fabric.
Before buying anything, move things around. Three habits cover most situations.
1. Get the mic close. The nearer it is to the speaker’s mouth, the less gain you need, and the less the wind competes with the voice. Hold a handheld about a fist from the mouth.
2. Use what’s already there. Trees, walls, fences, buildings and cars can all offer protection against wind. On a rooftop, place the speaking spot behind a parapet or a glass windbreak. In a park, tuck the setup behind a tent wall.
3. Hide the lav. For a lavalier, clipping it inside a shirt pocket rather than outside a tie can reduce wind noise. Under a jacket lapel or inside a collar works the same way, as long as the fabric doesn’t rub.
Also think about which way the speaker faces. If you can, have them stand with the wind at their side or back, so air isn’t blowing straight into the capsule. And do your soundcheck where the speaker will actually stand, at the time of day the event will happen. Wind on a Brooklyn waterfront at 4 p.m. is a different animal than the same spot at noon.
Wind lives in the low frequencies. A high-pass filter, often labeled low-cut on a mic or mixer, removes them. The research we reviewed notes that high-pass filters are effective on the 20 Hz to 250 Hz rumble associated with wind, and that this can be done during recording or in post.
For speech, a common starting range is 80 to 120 Hz for dialogue, or 70 to 100 Hz for interviews. Set it by listening. Cut too hard and you lose the warmth and fullness of the voice, which makes a speaker sound thin.
A few other settings habits:
• Engage the low-cut at the source if the mic or transmitter has one. It stops rumble from eating up headroom in the mixer.
• Keep gain honest. If you’re turning the gain up to fight a quiet speaker, the wind comes up with it. Fix the distance first.
• Put the filter on the channel, not the master, so music and playback keep their bass.
• Aim for intelligibility, not silence. Over-processing makes voices hollow or metallic, and a little residual air is more natural than a voice that sounds underwater.
For a deeper look at mics, mixers and lighting for smaller venues, see what we recommend for small NYC venues.
Sometimes you only find out afterward, usually when you play back the video from a ceremony. A few honest options:
1. Apply a careful high-pass filter. This can help, though filtering may negatively affect voices, and extreme buffeting is difficult to repair.
2. Try a de-plosive tool. Short bursts of low-frequency thump respond to the same kind of processing used for popped P sounds.
3. Use dedicated repair software. For example, the De-wind module in iZotope RX targets intermittent wind gusts, though it is generally ineffective against constant wind or extreme distortion.
The general rule is that post-production should be the last resort. It is far easier, and cheaper, to prevent the noise on the day than to rescue a once-in-a-lifetime toast later. If you’re filming the event, our notes on event recap videography cover how audio and video fit together afterward.
We have set up sound in enough backyards, rooftops and courtyards to know that the weather rarely cooperates with the timeline. What we tell every client is the same: plan for wind before you need to.
That means choosing mics that suit the space, bringing the right covers, and placing the speaking spot with the breeze in mind. It also means having someone on the day whose only job is the audio. A song operator or tech on site can ride the levels, swap a cover when a gust picks up, and keep the music flowing so your focus stays on the people in front of you.
Our packages are built around that idea. Delivery, setup and breakdown are included, and the gear is tested before it leaves us. For outdoor events, we match the system to the size of the crowd and the space, so a toast in a backyard sounds as clear as one in a ballroom.
PORCCI
Use this list the week before your event.
1. Check the setting. Is the speaking area open to the wind, or can you move it behind a wall, tent side or hedge?
2. Pick the mic for the job. Lavs for the ceremony or toast, handhelds with foam for singers and MCs, and an omnidirectional option where you can.
3. Pack the covers. Foam for light air, furry covers for exposed spots, a blimp if a shotgun mic is in play.
4. Test on location. Walk the speaker through the real position and listen for gusts, not just calm moments.
5. Set the low-cut. Start in the speech range above and adjust by ear.
6. Assign a backup. Keep a spare transmitter, spare covers and a person who knows the system.
For a full walkthrough of speakers, power and layout at home, our backyard party sound setup guide goes step by step.
If you’d rather hand this off, Porcci NYC delivers, sets up and breaks down the sound for you. Our AV and sound system packages start at $210 for the Small Party Package, with the Medium Events Package at $310, the Bigger Events Package at $440 and the Ultimate Package at $550. You can compare them on our AV and sound system rentals page.
Need someone running it live? A DJ service with a sound system starts from $990, and a song operator or tech staff member is $165. Local audio and visual rental pages are also available for Manhattan, Brooklyn and Staten Island.
Start with proper wind protection: a softie, zeppelin or furry cover that creates still air around the capsule. Then bring the mic close to the speaker, use natural windbreaks like walls or cars, and add a high-pass filter. Foam alone is not enough in real wind, particularly on shotgun mics.
Omnidirectional microphones are the most wind-tolerant because they are less prone to buffeting. Directional mics can be up to 20 dB more sensitive to wind noise. For people who speak while moving, a lavalier with a furry cover, placed close to the mouth, is a dependable choice.
Yes, slightly. Windscreens reduce turbulent pressure but also attenuate the acoustic signal, and stronger protection tends to affect the sound more. Pick the lightest cover that handles the conditions, so you get clean speech without muffling it.
A typical range is 80 to 120 Hz for dialogue and 70 to 100 Hz for interviews. Adjust by listening. If the voice starts to sound thin, lower the cutoff a little.
Partly. A gentle high-pass filter or a dedicated de-wind tool can tame occasional gusts. Constant wind or heavy distortion is very hard to repair, so prevention on the day is the better plan.
• As the Wind Blows: Turbulent Noise on Outdoor Microphones
• Wind-induced noise in a screened microphone, Journal of the Acoustical Society of America
• The ear training guide for audio producers, NPR Training
• Effective Wind Protection, SCHOEPS Microphones
• Audio For Film 101: Ways to Reduce Wind Noise When Recording Outside
• A field recording guide, SoundGuys
• 5 Ways to Reduce Wind Noise When Filming Outdoors, Elgato


