Discover the best techniques for step-and-repeat lighting to enhance your backdrop. Achieve perfect exposure and faster guest flow!
The simplest reliable recipe for step-and-repeat lighting is a three-light setup: one key light, one fill light, and one or two dedicated lights aimed at the backdrop itself. Keep subjects 4 to 6 feet from the backdrop and run everything on manual flash power instead of TTL. That combination gets you readable logos, matching exposures from guest to guest, and a line that keeps moving instead of backing up at the step-and-repeat with the help of effective guest communication and line management.
TL;DR:
• Ensure your backdrop is matte fabric, at least 8 feet wide, and positioned slightly angled to minimize glare and reflections.
• Use a three-light setup with a key and fill at 45 degrees and backdrop lights around 60 to 70 percent of key power for even, consistent exposure.
• Set your camera to manual flash, ISO between 200-400, aperture f/4 to f/8, and a fixed white balance to avoid exposure variation during the event.
• Run test shots with real guests beforehand to verify lighting ratios, logo visibility, and backdrop reflectivity, adjusting lights accordingly.
• Consider hiring a professional team for larger or high-profile events to ensure immediate problem-solving and setup consistency.
• What Equipment Do You Need for Step-and-Repeat Lighting?
• How Do You Set Up Three-Point Lighting for a Step-and-Repeat?
• Which Backdrop Materials and Layouts Work Best Under Flash?
• What Camera Settings Work Best for Step-and-Repeat Photos?
• How Do You Fix Common Step-and-Repeat Lighting Problems?
• When Should You Hire a Lighting and Setup Team Instead of DIY?
• Book Your Step-and-Repeat Lighting Setup
• Sources
• FAQ
You don’t need a truckload of gear to light a step-and-repeat correctly. You need the right pieces, set up the right way, every time.
A minimal kit that covers most events includes:
• Two strobes or monolights (or a matched pair of speedlights for smaller setups)
• One or two large softboxes to soften key and fill light
• At least one dedicated backdrop light or LED panel
• Light stands rated for your modifiers, plus sandbags for every stand
• Radio triggers so you’re not chasing sync cables through a guest line
• Diffusion gel or CTO/CTB correction gels, gaffer tape, and cable covers or ramps
Whether you rent or buy comes down to how often you’re shooting step-and-repeats. If this is a once-a-year gala, renting monolights and stands from an event rental company costs less than owning gear that sits in a closet for eleven months. If you’re a working event photographer or planner booking two or more of these a month, owning your kit pays for itself fast and lets you build muscle memory with the same modifiers every time.
Step-and-repeat lighting is a direct application of three-point lighting, the same key/fill/back structure used in portrait studios, adapted for a backdrop that has to stay legible under flash and hold up across hundreds of near-identical shots.
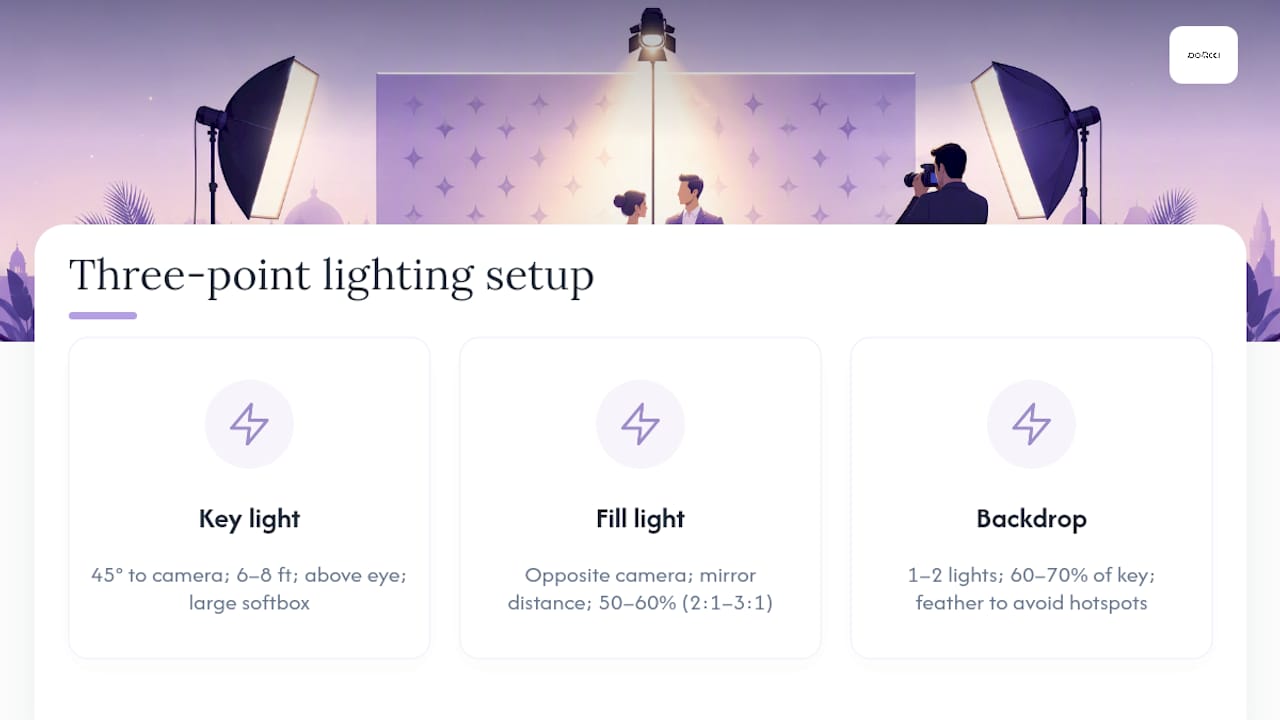
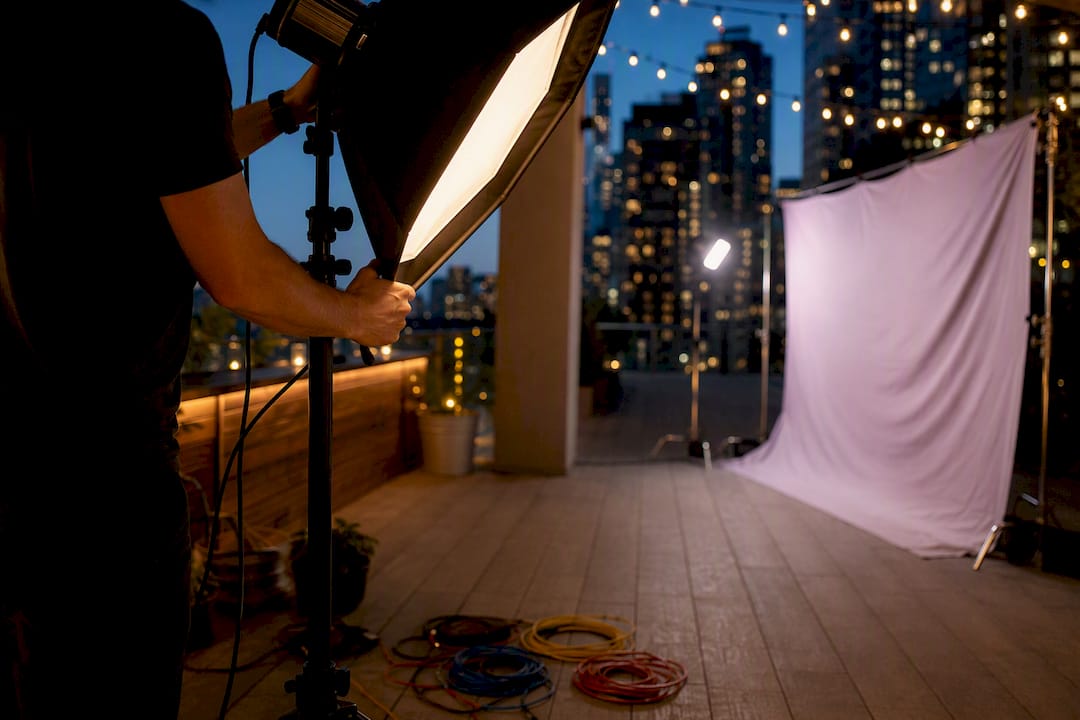
Key light goes at roughly 45 degrees to the camera axis, positioned 6 to 8 feet from where subjects will stand, and raised slightly above eye level. Use a large softbox or umbrella here. A bigger modifier at this distance gives you softer falloff across a group of five people instead of a hard spotlight on the one person standing dead center.
Fill light sits on the opposite side of the camera, roughly mirroring the key’s distance, but running at 50 to 60 percent of the key’s power. That gets you a 2:1 or 3:1 ratio, which is the standard starting point for portrait work and translates well to step-and-repeat because it keeps shadows visible without letting them go muddy or block up logo text on one side of a subject’s face.
Backdrop lights are the piece most photographers skip, and it’s the one that makes sponsor logos actually readable in the final image. Aim one or two lights directly at the backdrop, separate from your key and fill, and feather them so you don’t create a bright hotspot in the center of the wall. Start these around 60 to 70 percent of key power and adjust based on how reflective your backdrop material is.
Before doors open, run a test sequence: shoot a single subject, then a pair, then a group of four or five. Check your camera’s histogram for even light distribution left to right, and zoom in on the LCD preview to confirm the logo text near the top of the frame isn’t blown out or lost in shadow. Pro Tip: Shoot your test group at the tallest and shortest expected height range you’ll see that night. If both look evenly lit, your ratios are dialed in.
Your lighting setup only works as well as the material it’s hitting. Glossy vinyl backdrops bounce flash back at the camera and create hotspots that wash out logos, which is exactly the problem dye-sublimation matte fabric solves. Matte fabric diffuses light instead of reflecting it, and it packs smaller and steams out wrinkles faster than vinyl, which matters if you’re running the same backdrop across multiple events in a season.

Vinyl still has a place outdoors, where it holds up better against wind and moisture, but specify a matte laminate finish rather than gloss if you go that route.
Logo layout matters as much as material. Use a staggered or offset grid rather than a strict repeating row, and leave an 8 to 12 inch buffer above the head zone where logos won’t get cropped or shadowed by the key light’s edge. For sizing, an 8x8 foot wall works for singles and couples, while an 8x10 or 8x12 wall gives wider groups room to fit without crowding the frame edges.
Position subjects 4 to 6 feet in front of the backdrop and angle the wall itself very slightly, just a few degrees off perpendicular to the camera, to deflect specular glare away from the lens. Mark that standing line on the floor with tape so every guest lands in the same spot. Avoid metallic inks or high-gloss laminate finishes entirely. Under repeated flash pops, they create bright blown-out patches that no amount of post-processing fixes cleanly.
Set your flash to manual power and leave TTL off for the entire event. TTL recalculates exposure for every single shot, which means guest number 40 might come out a stop brighter or darker than guest number 5 depending on what they’re wearing. Manual power removes that variable entirely.
A solid starting point is ISO 200 to 400, aperture between f/4 and f/8 depending on how many people you’re fitting in frame (wider aperture for solo shots, narrower for groups of four or more to keep everyone in focus), and shutter speed at or just below your camera’s flash sync speed.
Pick a white balance setting and stick with it for the night rather than letting auto white balance drift shot to shot. If your venue has mixed lighting, a gray card reading at the start locks in consistency.
Radio triggers beat optical ones in a crowded room where other flashes or camera phones can trip an optical receiver by accident. If you’re running speedlights instead of monolights, watch your recycle times between rapid shots. Nothing slows a line down like waiting on a flash that hasn’t finished charging.
Run your three-person test shot (short, tall, and average height) before the first real guest steps up, and check the LCD for shadow placement and even skin tone rendering across all three.
Most step-and-repeat lighting failures trace back to setup shortcuts, not bad gear. Here’s the pre-event sequence and the fixes for the issues that show up most often:
1. Run test shots with real people before doors open, not just a light meter reading.
2. Sandbag every light stand, no exceptions, even for a 20-minute activation.
3. Tape down all cables and route them away from the standing line and photographer’s path.
4. Mark the exact standing position on the floor with gaffer tape.
5. Confirm your backdrop lights and venue’s ambient house lights aren’t fighting each other in the frame.
When problems show up mid-event, here’s what’s usually happening. A hotspot in the center of the backdrop means your backdrop light is too close or too direct. Feather it or pull it back a foot. Shadows falling on the backdrop behind subjects usually mean people are standing too close to the wall. Move the standing line forward another 1 to 2 feet. Color casts from mixed venue lighting get fixed with a gel on your flash matched to the room’s ambient temperature, or by taking a fresh white balance reading off a gray card.
For safety, keep one person assigned per stand during load-in and load-out, keep a clear path behind the backdrop for anyone changing batteries or adjusting lights, and never leave cable runs across a walkway without a ramp cover.
Pro Tip: If your backdrop material is dark, add a small rim or hair light behind the subject line. It’s the fastest fix for guests blending into a navy or black backdrop.
A practiced setup crew catches problems a solo planner won’t see until the first blurry photo comes back. Equipment selection, stand placement, and power ratios take repetition to get right, and a rental partner brings staff who’ve already made those mistakes on someone else’s event.
We’d point to Porcci NYC’s approach for large sponsor walls, press-heavy events, or any night where the schedule doesn’t leave room for a lighting redo. If your budget supports it and the event carries real visibility, hiring out the lighting and backdrop setup buys you consistency you can’t easily replicate solo.
— PORCCI
Porcci NYC handles the part most planners dread: getting the lighting ratios, backdrop placement, and equipment right before the first guest ever steps up to the wall. A typical lighting and backdrop package includes delivery, on-site setup by a trained tech, a staffed activation if you need it, and full teardown, so you’re not troubleshooting a hotspot mid-event with a line building behind it.
To get a quote, have your event date and time, expected guest count, desired backdrop dimensions, and any venue access notes (loading dock, power availability, ceiling height) ready. Browse our AV and lighting rental packages for NYC, or check availability for Jersey City and Brooklyn events, then request a quote to lock in your date.
• Three-point lighting — Wikipedia
• Step & Repeat Design Tips Photographers Appreciate | AlphaGraphics Atlanta Buckhead
• Three-point lighting — ExpertPhotography
• Step and Repeat Banners: The Complete 2026 Guide – C17media
The name comes from how the setup functions at events: guests step in front of the branded backdrop, a photo is taken, and the process repeats with the next person or group in line.
Pricing varies widely based on size, material, and whether lighting and staffing are included, so get a direct quote based on your event’s dimensions and guest count rather than relying on a flat industry average.
A good step-and-repeat combines a matte, non-reflective backdrop material, an offset logo grid with adequate spacing, and dedicated backdrop lighting separate from the key and fill lights so sponsor logos stay legible in every shot.
Definitions vary across photography schools, and there’s no single agreed-upon “four C’s” framework specific to step-and-repeat lighting. Focus instead on the fundamentals that reliably work: correct placement, consistent power ratios, adequate coverage of the backdrop, and careful control of glare and shadow.
Manual flash power is strongly preferred because it keeps exposure consistent across every guest, while TTL recalculates per shot and can produce visibly inconsistent results across a long guest line.
Discover the best techniques for step-and-repeat lighting to enhance your backdrop. Achieve perfect exposure and faster guest flow!
The simplest reliable recipe for step-and-repeat lighting is a three-light setup: one key light, one fill light, and one or two dedicated lights aimed at the backdrop itself. Keep subjects 4 to 6 feet from the backdrop and run everything on manual flash power instead of TTL. That combination gets you readable logos, matching exposures from guest to guest, and a line that keeps moving instead of backing up at the step-and-repeat with the help of effective guest communication and line management.
TL;DR:
• Ensure your backdrop is matte fabric, at least 8 feet wide, and positioned slightly angled to minimize glare and reflections.
• Use a three-light setup with a key and fill at 45 degrees and backdrop lights around 60 to 70 percent of key power for even, consistent exposure.
• Set your camera to manual flash, ISO between 200-400, aperture f/4 to f/8, and a fixed white balance to avoid exposure variation during the event.
• Run test shots with real guests beforehand to verify lighting ratios, logo visibility, and backdrop reflectivity, adjusting lights accordingly.
• Consider hiring a professional team for larger or high-profile events to ensure immediate problem-solving and setup consistency.
• What Equipment Do You Need for Step-and-Repeat Lighting?
• How Do You Set Up Three-Point Lighting for a Step-and-Repeat?
• Which Backdrop Materials and Layouts Work Best Under Flash?
• What Camera Settings Work Best for Step-and-Repeat Photos?
• How Do You Fix Common Step-and-Repeat Lighting Problems?
• When Should You Hire a Lighting and Setup Team Instead of DIY?
• Book Your Step-and-Repeat Lighting Setup
• Sources
• FAQ
You don’t need a truckload of gear to light a step-and-repeat correctly. You need the right pieces, set up the right way, every time.
A minimal kit that covers most events includes:
• Two strobes or monolights (or a matched pair of speedlights for smaller setups)
• One or two large softboxes to soften key and fill light
• At least one dedicated backdrop light or LED panel
• Light stands rated for your modifiers, plus sandbags for every stand
• Radio triggers so you’re not chasing sync cables through a guest line
• Diffusion gel or CTO/CTB correction gels, gaffer tape, and cable covers or ramps
Whether you rent or buy comes down to how often you’re shooting step-and-repeats. If this is a once-a-year gala, renting monolights and stands from an event rental company costs less than owning gear that sits in a closet for eleven months. If you’re a working event photographer or planner booking two or more of these a month, owning your kit pays for itself fast and lets you build muscle memory with the same modifiers every time.
Step-and-repeat lighting is a direct application of three-point lighting, the same key/fill/back structure used in portrait studios, adapted for a backdrop that has to stay legible under flash and hold up across hundreds of near-identical shots.
Key light goes at roughly 45 degrees to the camera axis, positioned 6 to 8 feet from where subjects will stand, and raised slightly above eye level. Use a large softbox or umbrella here. A bigger modifier at this distance gives you softer falloff across a group of five people instead of a hard spotlight on the one person standing dead center.
Fill light sits on the opposite side of the camera, roughly mirroring the key’s distance, but running at 50 to 60 percent of the key’s power. That gets you a 2:1 or 3:1 ratio, which is the standard starting point for portrait work and translates well to step-and-repeat because it keeps shadows visible without letting them go muddy or block up logo text on one side of a subject’s face.
Backdrop lights are the piece most photographers skip, and it’s the one that makes sponsor logos actually readable in the final image. Aim one or two lights directly at the backdrop, separate from your key and fill, and feather them so you don’t create a bright hotspot in the center of the wall. Start these around 60 to 70 percent of key power and adjust based on how reflective your backdrop material is.
Before doors open, run a test sequence: shoot a single subject, then a pair, then a group of four or five. Check your camera’s histogram for even light distribution left to right, and zoom in on the LCD preview to confirm the logo text near the top of the frame isn’t blown out or lost in shadow. Pro Tip: Shoot your test group at the tallest and shortest expected height range you’ll see that night. If both look evenly lit, your ratios are dialed in.
Your lighting setup only works as well as the material it’s hitting. Glossy vinyl backdrops bounce flash back at the camera and create hotspots that wash out logos, which is exactly the problem dye-sublimation matte fabric solves. Matte fabric diffuses light instead of reflecting it, and it packs smaller and steams out wrinkles faster than vinyl, which matters if you’re running the same backdrop across multiple events in a season.
Vinyl still has a place outdoors, where it holds up better against wind and moisture, but specify a matte laminate finish rather than gloss if you go that route.
Logo layout matters as much as material. Use a staggered or offset grid rather than a strict repeating row, and leave an 8 to 12 inch buffer above the head zone where logos won’t get cropped or shadowed by the key light’s edge. For sizing, an 8x8 foot wall works for singles and couples, while an 8x10 or 8x12 wall gives wider groups room to fit without crowding the frame edges.
Position subjects 4 to 6 feet in front of the backdrop and angle the wall itself very slightly, just a few degrees off perpendicular to the camera, to deflect specular glare away from the lens. Mark that standing line on the floor with tape so every guest lands in the same spot. Avoid metallic inks or high-gloss laminate finishes entirely. Under repeated flash pops, they create bright blown-out patches that no amount of post-processing fixes cleanly.
Set your flash to manual power and leave TTL off for the entire event. TTL recalculates exposure for every single shot, which means guest number 40 might come out a stop brighter or darker than guest number 5 depending on what they’re wearing. Manual power removes that variable entirely.
A solid starting point is ISO 200 to 400, aperture between f/4 and f/8 depending on how many people you’re fitting in frame (wider aperture for solo shots, narrower for groups of four or more to keep everyone in focus), and shutter speed at or just below your camera’s flash sync speed.
Pick a white balance setting and stick with it for the night rather than letting auto white balance drift shot to shot. If your venue has mixed lighting, a gray card reading at the start locks in consistency.
Radio triggers beat optical ones in a crowded room where other flashes or camera phones can trip an optical receiver by accident. If you’re running speedlights instead of monolights, watch your recycle times between rapid shots. Nothing slows a line down like waiting on a flash that hasn’t finished charging.
Run your three-person test shot (short, tall, and average height) before the first real guest steps up, and check the LCD for shadow placement and even skin tone rendering across all three.
Most step-and-repeat lighting failures trace back to setup shortcuts, not bad gear. Here’s the pre-event sequence and the fixes for the issues that show up most often:
1. Run test shots with real people before doors open, not just a light meter reading.
2. Sandbag every light stand, no exceptions, even for a 20-minute activation.
3. Tape down all cables and route them away from the standing line and photographer’s path.
4. Mark the exact standing position on the floor with gaffer tape.
5. Confirm your backdrop lights and venue’s ambient house lights aren’t fighting each other in the frame.
When problems show up mid-event, here’s what’s usually happening. A hotspot in the center of the backdrop means your backdrop light is too close or too direct. Feather it or pull it back a foot. Shadows falling on the backdrop behind subjects usually mean people are standing too close to the wall. Move the standing line forward another 1 to 2 feet. Color casts from mixed venue lighting get fixed with a gel on your flash matched to the room’s ambient temperature, or by taking a fresh white balance reading off a gray card.
For safety, keep one person assigned per stand during load-in and load-out, keep a clear path behind the backdrop for anyone changing batteries or adjusting lights, and never leave cable runs across a walkway without a ramp cover.
Pro Tip: If your backdrop material is dark, add a small rim or hair light behind the subject line. It’s the fastest fix for guests blending into a navy or black backdrop.
A practiced setup crew catches problems a solo planner won’t see until the first blurry photo comes back. Equipment selection, stand placement, and power ratios take repetition to get right, and a rental partner brings staff who’ve already made those mistakes on someone else’s event.
We’d point to Porcci NYC’s approach for large sponsor walls, press-heavy events, or any night where the schedule doesn’t leave room for a lighting redo. If your budget supports it and the event carries real visibility, hiring out the lighting and backdrop setup buys you consistency you can’t easily replicate solo.
— PORCCI
Porcci NYC handles the part most planners dread: getting the lighting ratios, backdrop placement, and equipment right before the first guest ever steps up to the wall. A typical lighting and backdrop package includes delivery, on-site setup by a trained tech, a staffed activation if you need it, and full teardown, so you’re not troubleshooting a hotspot mid-event with a line building behind it.
To get a quote, have your event date and time, expected guest count, desired backdrop dimensions, and any venue access notes (loading dock, power availability, ceiling height) ready. Browse our AV and lighting rental packages for NYC, or check availability for Jersey City and Brooklyn events, then request a quote to lock in your date.
• Three-point lighting — Wikipedia
• Step & Repeat Design Tips Photographers Appreciate | AlphaGraphics Atlanta Buckhead
• Three-point lighting — ExpertPhotography
• Step and Repeat Banners: The Complete 2026 Guide – C17media
The name comes from how the setup functions at events: guests step in front of the branded backdrop, a photo is taken, and the process repeats with the next person or group in line.
Pricing varies widely based on size, material, and whether lighting and staffing are included, so get a direct quote based on your event’s dimensions and guest count rather than relying on a flat industry average.
A good step-and-repeat combines a matte, non-reflective backdrop material, an offset logo grid with adequate spacing, and dedicated backdrop lighting separate from the key and fill lights so sponsor logos stay legible in every shot.
Definitions vary across photography schools, and there’s no single agreed-upon “four C’s” framework specific to step-and-repeat lighting. Focus instead on the fundamentals that reliably work: correct placement, consistent power ratios, adequate coverage of the backdrop, and careful control of glare and shadow.
Manual flash power is strongly preferred because it keeps exposure consistent across every guest, while TTL recalculates per shot and can produce visibly inconsistent results across a long guest line.